Cycloid -- VektorCAD Tutorial
This tutorial shows how to construct a cycloid -- the locus traced by a point on a circle rolling without slipping along a straight line.
Theory
A cycloid is generated when a circle of radius r rolls along a straight line. The pitch (one complete arch) equals the circumference of the generating circle: P = 2 x pi x r.
Conventions
- Normal thickness for construction (base line, ordinates, helper circles, dimensions)
- Thick for the final cycloid curve
carccommand (center+radius arc that cuts a selected entity) for accurate intersection pointssplineto draw the smooth locus- Entity Snap ON throughout (Endpoint, Midpoint, Center, Perpendicular recommended)
Tutorial Video
Problem Statement
Construct one arch of a cycloid generated by a point on the circumference of a circle as it rolls on a straight line without slipping.
| Given | Value |
|---|---|
| Generating circle radius (r) | 20 mm |
| Pitch (P = 2 x pi x r) | approx. 126 mm |
| Divisions | 12 equal parts |
| Task | Construct one cycloid arch |
Objective:
| Requirement | Details |
|---|---|
| Commands used | Line, Circle, Point, UCS, Carc, Spline, Polar Array, Divide, Text |
| Construction lines | Normal thickness |
| Final cycloid | Thick thickness |
| Entity Snap | ON throughout |
Step-by-Step
1) Setup
- Thickness -- set to Normal (Thin / Normal / Thick)
- Entity Snap ON and Snap ON for accurate horizontals and verticals
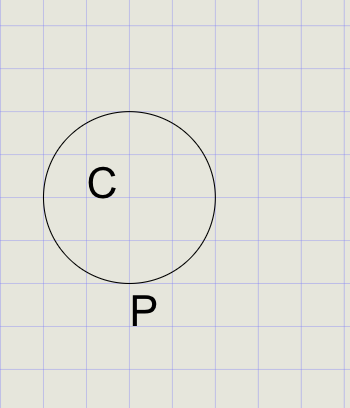
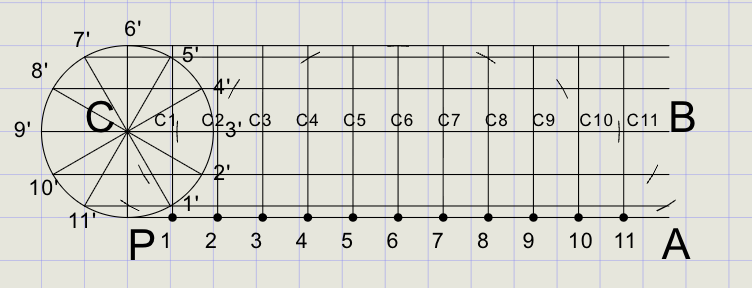
2) Draw the Base (Rolling) Circle
- Click Circle on the toolbar
- Specify the circle center on the grid
- At the prompt, enter
20for the radius - Use Text to label the center as
C - Label the bottom point of the circle as
P(the generating point)
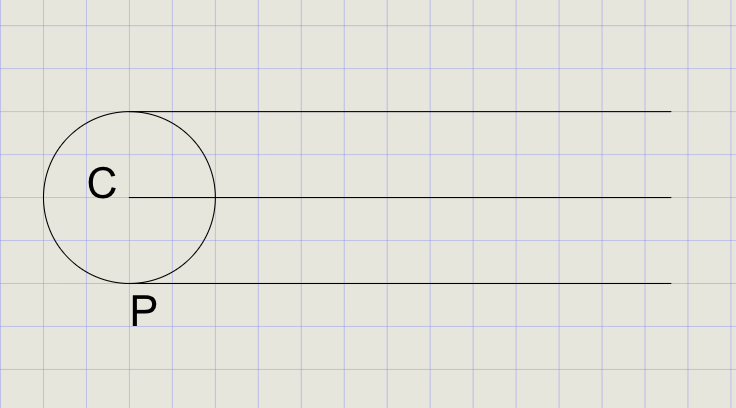
3) Draw Line PA and Parallel Lines
-
Calculate the pitch:
P = 2 x pi x r = 2 x 3.14159 x 20 = 125.66, rounded to 126 mm -
Draw a horizontal line starting from point
Pwith a length of126 -
Using the Copy command, copy this line to pass through the circle's center and top quadrant
Tip
Use the virtual keyboard calculator to compute 2 x 3.14159 x 20 for an accurate pitch value.
4) Divide the Generating Circle into 12 Equal Parts
- Draw a line from
C(center) toP(bottom point) - From the Copy dropdown, click Polar Array
- Select line
CPand press Enter -
At the prompts:
Prompt Value Total number of items 12Center point Select CFull rotation 360 -
Mark intersection points
1'through11'around the circle

5) Divide Line PA into 12 Equal Parts
- In the Format Panel, set point size to
1 - From the Point dropdown, click Divide
- Select line
PAand enter12 - Label the division points as
1through11
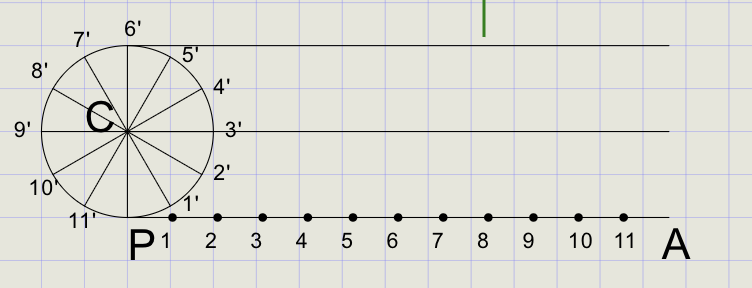
Note
The number of divisions on the base line must match the circle divisions (12 in this case) so each rolled position corresponds to a point on the circle.
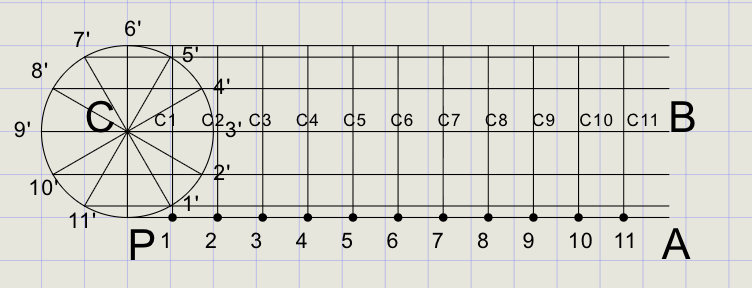
6) Draw Horizontal and Vertical Reference Lines
- Turn Ortho ON from the status bar
- Draw horizontal lines through points
11',10',9',8', and7' - Draw vertical lines through points
1to11 - Mark the new centers as
C1toC11at the intersections of verticals with lineCB
7) Use carc to Locate Points Pi
For each division i = 1 to 12:
- From the Arc dropdown, click Cutting Arc
-
At the prompts:
Prompt Action Specify radius 20(same as the generating circle)Specify center point Snap to Ci(shifted circle center after rolling i steps)Specify curve to cut Select the corresponding horizontal line -
The arc marks point
Pi-- the cycloid point for step i - Press Enter to repeat Cutting Arc
- Repeat for i = 1 to 12 to generate all cycloid points
Tip
The radius is always the same (r = 20) for every cutting arc. Only the center changes to each successive Ci position.
8) Draw the Cycloid
- In the Format Panel, switch to Thick line thickness
- Click Spline on the toolbar
- Pick points in order: P (start), then
P1, P2, ... P12, finishing at A - Press Enter to complete -- do not close the spline
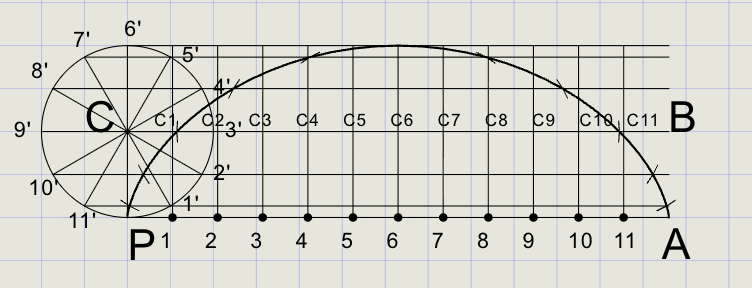
Warning
The cycloid is an open curve from P to A. Do not use Close -- just press Enter to end the spline.
Result Checklist
| Item | Status |
|---|---|
Base line PA drawn; PA = 2 x pi x r divided into 12 equal parts |
|
Generating circle at C divided into 12 equal arc parts |
|
| Horizontal lines drawn from each circle division point | |
Vertical lines through each base division; centers C1 to C11 marked |
|
carc with center = Ci and radius = 20 used to cut each horizontal |
|
Spline through P, P1 ... P12, A set to Thick |
Variations (Practice)
| Variation | What to try |
|---|---|
| Multiple arches | Extend the base by another pitch and repeat steps |
| Curtate trochoid | Tracing point inside the rim by distance k -- use radius r - k for cutting arcs |
| Prolate trochoid | Tracing point outside the rim by distance k -- use radius r + k for cutting arcs |
| Epicycloid | Roll the generating circle on the outside of a fixed circle (replace base line with a circle) |
| Hypocycloid | Roll the generating circle on the inside of a fixed circle |
Commands Recap
| Command | Purpose |
|---|---|
line |
Vertical ordinates and horizontal level lines |
circle |
Generating circle at start |
arraypolar |
Divide circle into 12 equal parts |
point |
Mark P, A, Ci, and Pi as needed |
divide |
Divide base line into 12 equal parts |
carc |
Center at Ci, radius r to cut level lines and get cycloid points |
spline |
Draw smooth cycloid through generated points |
text |
Labels and notes |
| Format | Normal for construction, Thick for final cycloid |
Export and share
You've constructed a cycloid using equal divisions, helper horizontals/verticals, carc for precise intersections, and spline for a clean final curve. Export to PDF to verify line weights before sharing.